Unleash die Blinkenlights!
When looking at PC cases for my most recent build, there were many adequate options, but only one stole my heart: the be quiet! Pure Base 500DX. Yes, it's bigger than I would've liked, and not the cheapest case either, but I was drawn to that understated front LED strip like a moth to flame—it offers all the fun of addressable LEDs, but without the whizbang gaudiness of three fans in rainbow mode 24/7.
But of course, anybody can make LEDs look beautiful. This is a journey to make them useful.
The Goal
Here's the idea: let's write some software so that just glancing at the front of the PC gives an overall impression of the system health (e.g., things like memory usage and CPU temperature). Like this!

Die Blinkenlights in action
Part 1: controlling the LEDs with OpenRGB
First of all, how do we control these LEDs anyway? The usual answer is: for every device, simply download the manufacturer's proprietary, Windows-only, buggy, CPU-torturing application, then try to run them in parallel and cross your fingers. Needless to say, I do not consider this an acceptable solution. Fortunately, the kindly developers of OpenRGB are here to save us from that morass. OpenRGB is an open source, cross-platform program for controlling RGB devices of all kinds. It exposes a network protocol so that external applications can drive the LEDs, and also provides SDKs for multiple programming languages to make that communication easier.
Using the OpenRGB GUI
A good way to get acquainted with OpenRGB and its various concepts is to mess around in the GUI; for instance, I found out
that although my motherboard exposes multiple "zones" of LEDs, JRAINBOW1 is the one connected to my case lights (the
others don't do anything). I also needed to inform OpenRGB how many physical LEDs there actually are in that
zone1—14 in my case. There are probably better ways of figuring this out, but I just set the zone size to some
improbably large number, then tried toggling individual LEDs; if adjusting the LED at index n doesn't cause any
perceptable change, your zone has fewer than n LEDs. (If you have lots of LEDs, this is a nice use case for gallop
search!)
Using the OpenRGB SDK
Clicking around in a GUI won't keep me satiated for long though; let's get this automated.
Here's how I thought about decomposing this problem: we want to register some number of functions—let's call them
"metrics"—that return some information about the system at a given point in time. We'll also want some generic
ways to convert the raw value of a metric (e.g., "CPU temperature is 42°C") to a meaningful value for a LED (e.g.,
"RGB colour #FF00FF"). Finally, we'll need some kind of main loop that periodically polls the metrics and updates the
LEDs accordingly.
I've implemented this design in a little Python package I call Asteria. I won't belabour the code here, but just to connect it to our plan above:
-
In
metrics.py, we define some functions that get system information by shelling out to well-known utilities (like thesensorsandfreecommands—yeah, it's not cross-platform at the moment, sorry!) -
instruments.pycontains the different LED "effects" we support (such as gradually fading from one colour to another as the input value varies). Those effects expect their input values to be in "nice" ranges (e.g., [0, 1]);scales.pyoffers some utilities to handle that for common mappings (e.g., "map 40 to 0, 90 to 1, and just use linear interpolation for any value in between") -
driver.pyhas two big responsibilities:-
It parses the provided config file—designing this was a little more complicated than I expected! A user has one or more OpenRGB devices, which each have one or more OpenRGB zones, each of which can have zero or more Asteria instruments (each of which might need a metric, which might need a scale). That sounds messy, but it's actually fairly straightfoward to represent with TOML's array of tables syntax, and I think the resulting config files are relatively easy to follow too.
-
It also provides the main event loop, where it polls the instruments and communicates with the OpenRGB server using the Python SDK (docs).
-
At this point, you could clone the Asteria repo and manually run it on your computer, were you so inclined. But of course, cloning git repos isn't the best way to distribute Python code…
Part 2: packaging our Python code
Python is a deceptive programming language: at first blush, it's so simple. So inviting, with its effortless
syntax—if needle in haystack; why, it's practically just English! It welcomes you—no, beckons you with
its "batteries included" standard library and cornucopia of other packages; "surely this will be the quickest way to
bang out this project," you tell yourself, and while writing your module, you believe it.
But then it comes time to package it.
An innocuous web search—"how to create python package"—precipitates your rapid descent into madness. It's
just setup.py, right? With setuptools? Uh… what do I actually put in
setup.py again? Ah, who cares; those are showing their age anyways, everyone is using
poetry these days. Or was it hatch?
flit? …there's one just called
build? Whatever you do, definitely don't put your actual code in a
src
directory.
No wait,
maybe
do?
As you turn to the actual format of these packages, the technical jargon slowly becomes a dada free association exercise scheduled inconviently close to lunch: should you build pickles? eggs? wheels?2
This is almost too much for one man to bear.
If you're writing Python in a work environment where deadlines are tight and the package audience is small, you might
(reasonably) look for some shortcuts. The most galaxy-brain strategy I've seen is "just keep the module in a shared NFS
directory and add that to your PYTHONPATH." There are… problems with this approach, but boy, is it ever easy to
deploy your changes!
But in this case, because Asteria is such revolutionary, life-changing software, I feel a sacred duty to share it with the world; this package simply must be published globally. For your collective sakes, I have confronted this overwhelming complexity, and, indeed, I have deftly untangled this Gordian Knot. Behold my solution:
Just follow this tutorial.
I have no further feelings on how you should lay out your package. I have no opinion as to which test runner or build tool you should use. My package is on PyPI and my soul is at peace. I have achieved moksha and truly embraced The Zen of Python.
Okay, fine; theatrics aside, there are basically three steps to creating a Python package in 2023:
- Write a
pyproject.tomlfile that describes your package's metadata. - Using a build tool, convert your source code into distributable formats: ideally, both "sdist" and "wheel"3 these days.
- Make your package available to others by uploading it to a repository (almost certainly PyPI).
The aforementioned guide walks you through each step with concrete examples.
There's one more thing that guide doesn't mention that may be of interest. If you're developing a command-line
application, you probably want users to be able to invoke it by its name alone—i.e. by running asteria, not
python -m asteria. To do that, you can either try reading PEP621
and the Entry points specification, or you can
just adapt this example for your own
pyproject.toml:
[project.scripts]
# Left-hand side: the name of the command to create (in this case, `asteria`).
# Right-hand side: the "entry point" to run for that command.
# "asteria.__main__:main" means "in module asteria's __main__.py, find the function `main()` and run it."
asteria = "asteria.__main__:main"
Finally, if you're interested in learning more about Python packaging, here are a few good articles I found to be helpful. Let us leave this place, enlightened, and never return.
Installing our package
That brings us to the other side of the coin: now that we've published our package, we need to install it. Experienced
Pythonistas know that this too can be a fraught experience; my old laptop is testament to the fact. Without constant
discipline, it can become easy to lose track of what came from where: you can install packages from your system package
manager (e.g., sudo apt install python3-numpy); you can blindly [sudo] pip install and let the files fall where they
may; you can try to sequester your packages to various types of isolated environments—with say,
conda, or venv—or, of course,
you could do all of these at once and leave yourself an unholy mess. As I did.
But no more! By way of repenting my sins, I now uphold these tenets:
-
Keep the system Python4 minimal. If a Python application isn't a system package, and it depends on other Python packages, it should live in a self-contained virtual environment.
-
The system package manager manages the system;
piphandles virtual environments. In other words, never runpip installoutside of a virtual environment. Also,pipdoesn't get to update itself. I must not be the only one with such proclivities, sincepipoffers some very helpful flags for such a setup. I've aliasedpipso that I never forget to add them:
$ type pip
pip is aliased to `pip --require-virtualenv --disable-pip-version-check'
# from `man pip`:
# --require-virtualenv
#       Allow pip to only run in a virtual environment; exit with an error otherwise.
#
# --disable-pip-version-check
#       Don't  periodically  check  PyPI  to determine whether a new version of pip is available for download. Implied
#       with --no-index.
Let's put this into practice and install Asteria:
$ cd ~/environments/
$ python -m venv asteria-test
$ cd asteria-test/
$ pip install asteria-openrgb
ERROR: Could not find an activated virtualenv (required).
$ # whoops! forgot to "activate" the virtual environment first:
$ . ./bin/activate
(asteria-test) $ pip install asteria-openrgb
Collecting asteria-openrgb
  Using cached asteria_openrgb-0.1.0-py3-none-any.whl (33 kB)
Collecting openrgb-python>0.2
  Using cached openrgb_python-0.2.15-py3-none-any.whl (26 kB)
Collecting tomli>2
  Using cached tomli-2.0.1-py3-none-any.whl (12 kB)
Installing collected packages: tomli, openrgb-python, asteria-openrgb
Successfully installed asteria-openrgb-0.1.0 openrgb-python-0.2.15 tomli-2.0.1
(asteria-test) $ asteria --help
usage: asteria [-h] [--address ADDRESS] [--port PORT] config

Asteria - a framework for driving an OpenRGB server

positional arguments:
  config

options:
  -h, --help         show this help message and exit
  --address ADDRESS
  --port PORT
Voilà: we have a working, self-contained installation of Asteria, and we didn't create any distressing clutter along the way.
Part 3: daily scheduling with systemd services & timers
Now that we have our code packaged up and cleanly installed, it should be trivial to have it run between, say, 9am and 10pm, right?
…right?
Running Asteria as a systemd service
Love it or hate it, systemd is a fixture of many Linux distributions today, and my Arch setup is
no exception. Although it (controversially) has many responsibilities, we'll focus on the most common: managing the
services running on a machine. Our use case is pretty simple; we want to be able to run OpenRGB and Asteria in the
background while the computer is running. Perhaps the simplest way to do so is to just open up a pair of terminals and
run openrgb --server in one and asteria config.toml in the other. Indeed, that will work, but it's a bit of a pain:
you'd need to do it manually every time you reboot, you have to remember the right flags/configs to pass, and it's not
easy to monitor if something goes wrong. With systemd, we can instead write a "unit file" that describes how to run
our service, then let systemd take care of the rest. systemd can handle dependencies between services, restart processes
if they crash unexpectedly, and capture logs for later reference (see the journalctl command).
The syntax for a basic service unit is pretty straightfoward. Here's an example from the OpenRGB AUR package (comments mine):
$ cat /usr/lib/systemd/system/openrgb.service
[Unit]
Description=Run openrgb server
# Wait for these services to start before starting OpenRGB
# (Technically this is just an _ordering_ dependency:
# OpenRGB can run without those other services)
After=network.target lm_sensors.service

[Service]
# Not sure why this is appropriate in this case ¯\_(ツ)_/¯
RemainAfterExit=yes
# systemd will run this command to start our service (N.B.: absolute paths are required)
ExecStart=/usr/bin/openrgb --server
# If the process crashes, restart it automatically
Restart=always

[Install]
# Basically, start this after the computer boots up
# More details: https://web.archive.org/web/20230213180654/https://unix.stackexchange.com/questions/506347/why-do-most-systemd-examples-contain-wantedby-multi-user-target/506374#506374
WantedBy=multi-user.target
In my case, installing the AUR package already copied that unit file to the right place,5 so all
that's required to start the service is systemctl enable --now openrgb.6 Sweet! Let's crib off of
that example to create a unit file for Asteria:
$ cat ~/.config/systemd/user/asteria.service
[Unit]
Description=Framework to automatically control LEDs via OpenRGB
# Similar to before, here we configure some dependencies. However, this time
# we're stricter: Asteria cannot run unless OpenRGB is already running;
# the "BindsTo" relationship expresses that.
BindsTo=openrgb.service
After=openrgb.service

[Service]
# `asteria` "binary" from the Python venv where we installed it
ExecStart=/home/josh/environments/asteria/bin/asteria /home/josh/.config/asteria/config.toml
# By default, systemd sends SIGTERM to stop processes--right now Asteria expects SIGINT
# for a clean exit. I should fix that in Asteria, but let's just override that for now...
KillSignal=SIGINT

[Install]
# Different target than before! Ignore for now; we'll get to it
WantedBy=default.target
At this point, I hit a little snag. My previous usage of systemd had been for real "system" level services, like a webserver; ones that should start up as soon as the machine boots up, regardless of whether any users are logged in. That fits how I think about running OpenRGB (where we only want one instance of the process running no matter how many users there are), but Asteria feels more like a user-level process to me: conceivably, you could have your Asteria config, I could have mine, and the LEDs could match whoever is using the computer at the time. (Admittedly, it gets weird if both those users are logged on at the same time.) To support this, systemd offers user units—basically think of an entirely separate systemd instance running just for your user. Sounds good; we'll have OpenRGB be a "system" unit, and make Asteria a user unit…
…except remember that part where I said "an entirely separate systemd instance?" Unfortunately, yes, that precludes user units from depending on system ones (or vice-versa). In this case, it's actually quite useful to have systemd manage the dependencies (since Asteria can't do anything without OpenRGB), so I opted to make my OpenRGB unit a user unit as well.7 Since this is my personal desktop, the difference is largely academic anyways.
Those minor details aside, we have some working systemd units! We can kick off Asteria with systemctl --user enable --now asteria.service—note that since we're dealing with user units, we'll need that --user flag on every
command. Configuring those dependencies correctly gets us some niceties too; e.g., if we try to stop OpenRGB, systemd
knows to first stop Asteria. That actually matters in this case, because if Asteria doesn't terminate cleanly, it can't
signal to OpenRGB to turn off the LEDs, so the LEDs will stay "stuck" in whatever their last colour was until you
manually intervene somehow.
Scheduling with systemd timers
Now that we have working systemd units for our services, all we need to do is run them on a schedule. What I'd really
like is for my LEDs to automatically turn on in the morning, and off at night. We'll just leave OpenRGB running 24/7,
and two trivial cron jobs will allow us to start/stop Asteria at a set time daily (by invoking systemctl --user [start|stop] asteria). Let's add those and close out this blog post:
$ crontab -e
-bash: crontab: command not found
What‽ I may be a mere greenbeard, and I know Arch is minimal by default, but isn't cron one of the venerable
UNIX ur-utilities? (Flips over to Arch wiki) Okay, so apparently systemd does that too now. With
timers. I could just install a cron and be done with this, but
let's see this systemd adventure through—in for a PID 1, in for a PID $(cat /proc/sys/kernel/pid_max), after
all.
So: earlier, we wrote two systemd service units, but there are other types of units too. As you can probably guess,
timers are another such type. My neophyte understanding is that every service unit can have an associated timer
unit;8 if the timer unit exists, systemd will start the service based on the timer. (Recall
that earlier we started/stopped services manually with systemctl.) We'll use a "realtime timer," which triggers at a
specific time every day:
$ cat ~/dotfiles/galadriel/.config/systemd/user/asteria.timer
[Unit]
Description=Start Asteria every morning

[Timer]
# cron-ish syntax; explore with, e.g., `systemd-analyze calendar '*-*-* 09:00:00'`
OnCalendar=*-*-* 09:00:00
# Run immediately if the last trigger was missed
Persistent=True

[Install]
WantedBy=timers.target
Well, that wasn't so bad—our timer unit is definitely longer than a single crontab line, but it's not egregious. That covers starting our job, but uh, how do we stop it?

I was surprised to learn this, but it seems like systemd timers don't natively support the notion of a "stop time". I've looked, I promise! Based on those posts, it looks like there's three options for stopping your service:
- Suck it up and write a cron job that calls
systemctl stop. - Use systemd's
RuntimeMaxSec=option if your service is only supposed to run for a certain length of time. - Have a second service be responsible for stopping the first one.
I've already ruled out 1). We probably could make option 2) work—starting at 9am and running for 13 hours * 60 minutes/hour * 60 seconds/minute = 46800 seconds brings us to 10pm—but that doesn't feel right to me either, so let's try 3). It'll even be a good excuse to explore a few last systemd unit options!
So, how can our second service stop Asteria? Well, the most obvious way is just to have it run systemctl --user stop asteria. Since our "service" in this case is just a command that needs to run once and exit, we'll have to tell systemd
that this is a Type=oneshot (so that it doesn't try to, e.g., "restart" our command after it runs). While that
approach ought to work, let's showcase one final dependency-based solution instead:
$ cat ~/.config/systemd/user/asteria-shutdown.service
[Unit]
Description=Dummy service to shut down Asteria
# This means "we can't run together"--if asteria-shutdown.service
# starts, systemd will stop asteria.service!
Conflicts=asteria.service

[Service]
# We don't actually care about the command; run a no-op
Type=oneshot
ExecStart=/usr/bin/true

[Install]
WantedBy=default.target

$ cat ~/.config/systemd/user/asteria-shutdown.timer
[Unit]
Description=Stop Asteria every evening

[Timer]
# Start asteria-shutdown.service at 10pm daily
OnCalendar=*-*-* 22:00:00
# Run immediately if the last trigger was missed
Persistent=True

[Install]
WantedBy=timers.target
Together, these four unit files accomplish the daily schedule we were looking for:
- At 9am,
asteria.timertriggers, causing systemd to startasteria.service. - At 10pm,
asteria-shutdown.timertriggers, causing systemd to startasteria-shutdown.service. That conflicts withasteria.service, so systemd stopsasteria.service.
This has been working well for me so far, but I definitely have mixed feelings about the systemd timers. It's nice that
they fit in alongside the existing systemd architecture, and they have some advantages (like being able to easily run
them manually with the ususal systemctl --user start), but the activation energy required to get started is much
higher than a simple cron job. I'm especially surprised by the lack of a "stop time" setting—maybe this isn't a
super common use case, but having to add a whole second service and timer feels a bit overly verbose to me.
Bonus: controlling it all from my phone
KDE Connect is magic software for connecting your phone and PC (among many other things); if you haven't used it yet, you should definitely check it out! You can preregister commands that run on your PC and trigger them from another device—combined with its Android widget, I can trivially toggle my PC's LEDs from my phone:
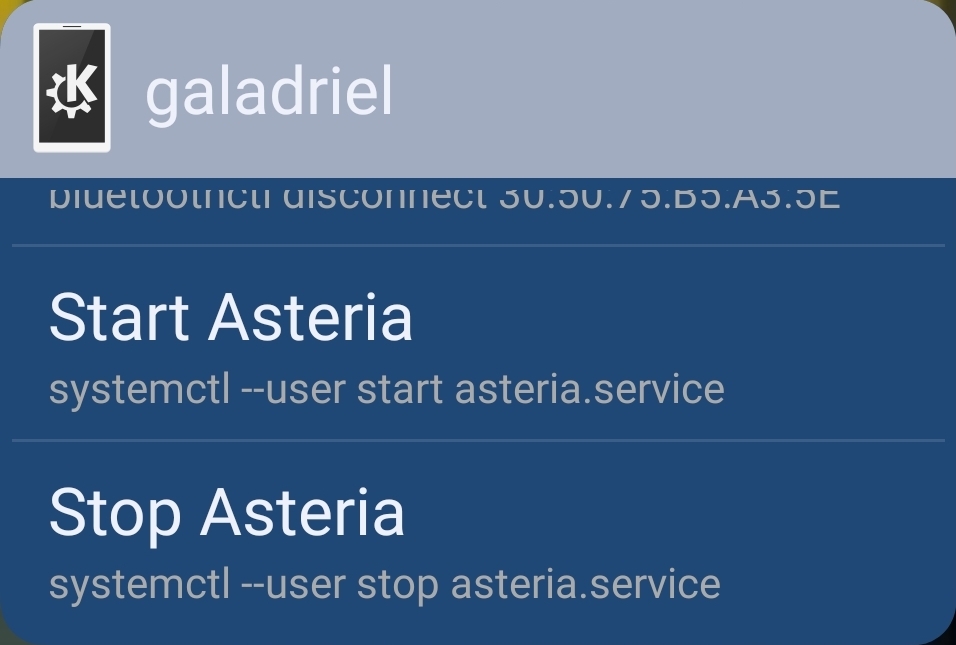
How did I send this screenshot to my PC? KDE Connect, obviously 😎
End Result
So there you have it: die Blinkenlights now offer a useful system overview at a glance.
It took us a little while to get there, but I think that the investment will prove to be worth it: Python packages and systemd units are going to be around for a while yet, so it's worth spending some time to understand them a little more deeply.
Until next time, may the LEDs guide your way, unless you're on an airplane.
It seems like OpenRGB can persist this information so that it doesn't need to prompt you
for it every time, but I don't fully understand how it manages all this configuration data. Under
~/.config/OpenRGB, there are a few files. OpenRGB.json
(documentation) has some general settings, but I
think zone sizes are stored in an OpenRGB "profile." The profiles themselves are binary, and don't seem to be
well-documented, but if I run xxd on ~/.config/OpenRGB/default.orp (which I created via the "Save Profile" button in
the GUI), I can see a descriptively-named ASCII string for each LED (e.g., JRAINBOW1 LED 1). Curiously though, there's
also a different file sizes.ors lying around, which I think was created automatically; just eyeballing xxd again,
it looks similar to a profile file. Plus, when running OpenRGB under strace, I can see OpenRGB open both default.orp
and sizes.ors. Oh yeah, and at one point, OpenRGB would immediately crash when I ran it, and moving that sizes.ors
file fixed things again. (I think I might've corrupted it by accidentally running multiple instances of the OpenRGB
server at the same time??) So, all things considered… I'm not sure exactly what's going on here, but if you want
to save your zone sizes, you probably need a profile. 🤷
Apparently that's "wheel" as in "wheel of cheese," as in Cheese Shop sketch, at least according to this presentation by Python Packaging Working Group member Dustin Ingram.
"sdist" is short for "source distribution." Think of a Python module that only uses the standard
library: you could zip that into one file, copy it to another computer, unzip it, and use it on the second computer
without too much fuss (you do need to make sure the Python versions are compatible, etc.). In this case, to share our
Python package, it suffices to share the source code itself; that's (mostly) what an sdist is. Conversely, now
consider the case where our Python module has a dependency on something written in C (e.g., some NumPy stuff)—just
bundling those .c files with our other Python source code no longer yields a working Python package by itself; some
other build step is required before you can use the package. (Here, presumably that build step is compiling the C
code.) It can be tricky to get a working toolchain for those build steps, plus they can take a while, so it'd be
annoying if every user of the package had to run them individually. The Wheel format helps avoid that problem: it's a
"built distribution," which means that all of those build steps have already been run (for a particular target: think
operating system, Python version, etc.)—basically, copy the wheel to the right location and you'll have a working
Python package. That's why building and uploading a wheel of your package is so helpful: it can potentially save every
user from have to run the build steps. (The best resource I've found to wrap my head around all these terms is the
PyPA Glossary.)
By "system Python," I just mean the default Python that shipped with/is managed by your operating
system and all the packages it sees in the default locations. Basically, "system Python" = "whatever gave you
/bin/python." Likewise, "system package" = "any package you installed with your system's package manager" (not
pip!).
I assume the correct location for systemd units depends on your distribution; on Arch
/usr/lib/systemd/system/ is for "units provided by installed packages," /etc/systemd/system/ is "for units
installed by the system administrator," and ~/.config/systemd/user/ is for user units (quoting from
the
wiki).
systemd differentiates between enabling (systemctl enable $UNIT) and starting (systemctl start $UNIT) units. My rough understanding is that you can think of enabling a unit as "making it known to and
recognized by systemd," whereas starting a unit means "do whatever it takes to run this thing now" (in our case, running
the ExecStart command). As you might have guessed, the "inverse" operations are stop and disable. Oh and if you
edit the unit files you need to run systemctl daemon-reload to get systemd to pick up the changes.
That's why my asteria.service example has default.target instead of multi-user.target in the
[Install] section; multi-user.target doesn't exist for user units (at least by default). You can also see that
the unit file is under ~/.config/systemd/user, not /usr/lib/systemd/system.
Services and timers are just associated by filename; e.g., for asteria.service, the
associated timer (if any) should be named asteria.timer.